Showing posts with label Copy-cat. Show all posts

Monday, December 20, 2010

Christmas Candy Jar

In October I saw this idea for a Halloween Candy Jar over at A Pumpkin and a Princess. I loved it so much I ran out and got all of the stuff. It cost me less than $5 to make this!!

I decided to do mine red because it would match my kitchen. I just barely added the green ribbon to it and loveee it.

I got everything at Roberts except for the glass jar, which came from-- you guessed it~ the dollar store!

You can go to A Pumpkin and a Princess for directions.

Wednesday, December 8, 2010

10 Days of Christmas Crafting - Day 5 & 6: Christmas Blocks & Glitter Trees

Sorry, I've fallen behind the 10 days of Crafting, haha. But no worries, I have 2 crafts for ya today.


Christmas Blocks

These are sooo easy and are so cute.
1. Have someone cut you some 2 x 4's in all random sizes, the more random - the better!
2. After that pick what scrapbooking paper you want and cut to size.
3. I used my cricut to cut the letters.
4. Then Modge Podge it all on! I told you its easy!


Glitter Trees

I just used the instructions from Eighteen25. Click here for the instructions.
I didn't use the candlestick holders because I couldn't find any.
They are sooo easy, and SO cute!


Look how cute they look on top of my ugly cabinets.

Sunday, November 28, 2010

10 days of Christmas Crafting- Day 2: 2 x 2 Christmas Tree


My sister saw this tree at the quilted bear last year and we knew we could make it so much cheaper. Don't worry, she bought one for reference- so its not as bad right?!

The directions are pretty simple:

1. Have a manly man cut the wood for you. He will love every second of it. In our case my bro did it for us. Have him sand the wood while he's at it.


2. Paint the wood.
3. While its drying pick out which scrapbook paper you want to use. (When you make this craft with lots of girls you can share paper. It works out perfectly.)
4. Cut the paper to the size of the wood and glue it on with a gluestick.
5. After that sand the edges with a nail file, or sandpaper.
6. Add some embellishments like ribbon, ric rac, buttons, etc.
7. Drill a hole in the top of the tree to add wire and a star.

This craft is so easy you will want to make these for everyone you know. All of us made atleast 2.

If you want to have this look more like a Christmas tree, do all green paper. My mom did and it was soo cute.

Saturday, November 27, 2010

10 days of Christmas Crafting - Day 1:Ornament Wreath


I think I'm a little behind the times. I think ornament wreaths went around blog-land last year, or the year before. But here's hoping that this is a new idea for some of you.

This craft is very easy, and very cheap. I think overall I spend about $12, but it's hard to say since my sister in law made this with me too and we shared the ornaments, but I think $12 is a good enough guess.

Here's what you need:

- Wire Hanger
- Ornaments (All different sizes and colors)
- Glue-gun
- Optional: Husband to bend the wire for you. :)

I bought all my ornaments at the dollar store and at the Target Dollar Spot. Target has smaller ones, which are good for the fillers. Here's an example of the one's I got at the dollar store:


We followed the instructions from Eddie Ross. (He is the guy that came up with this wreath!) Since his instructions are so easy, I'll just send you his way.

Here are some pointers that we learned:

- Have your husband bend the wire for you. It will occupy them, so they don't bug you about hurrying to finish your craft. Plus they will be in competition to see who can make the roundest circle. (We made these on Thanksgiving and our hubby's wanted to go home!)
- Make sure to take the metal part off and glue it on, even if it seems like its secure and won't fall off... do it anyway. This way you won't be re-gluing a bunch of ornaments back on each year.
- It doesn't look good until you get half way done, we were both questioning if this was going to turn out looking good or not.
- You will need more ornaments that you think you will. I don't know how many I used, but Eddie Ross used 80!!
- String all the ornaments on first, then arrange them how you want them to be.


This was the easiest craft ever! It turned out perfectly because I wanted to do red, green and silver and my sister in law wanted to do red, green, and gold. So none of them went to waste!

I ended up having a million ornaments left, so I decided to put some in my Hurricane Vase. Then I added some ribbon.


Will you be making an ornament wreath? I would love to see yours!

Monday, November 8, 2010

Give Thanks Tree

I want to start this post off by saying that these pics are really off. This project looks sooo much better in person, and much more fall-ish. I'll show you a pic with the flash and without so you can see how much different it looks in each picture....


With Flash


Without Flash

I Love Thanksgiving but it is usually just about being with family and all the food to us, and this year I want it to be more about what we are thankful for and focus on all that we have. I wanted to incorporate writing what we are thankful for on leaves somehow and have thought of all sorts of ideas like a garland, a thankful jar, but then I decided to do a Thankful Tree. There are millions of ideas floating around but none really fit what I had in mind. Then I remembered how my friend Erika @ Opps I craft my pants made a flower out of Paint Swatches from Home Depot. (Seriously, She is Amazzzinggg!) Then, I saw the Fall Tree that Robyn @ Something Pretty made... perfectttt.

It's pretty easy, first go to Home Depot and take an embarrassing amount of Paint Swatches.
When you get home paint a board your desired color, I decided on a light tan color.
After it dries, using a pencil draw a Tree with branches, once you are satisfied with how it looks color in with a brown sharpie.
After that I decided that the leaves were too big so I decided to cut them down.
Arrange the leaves however you like.
I also added the Words "Give Thanks" using scrapbooking letters, and added a little bit of scrapbooking paper on the bottom.
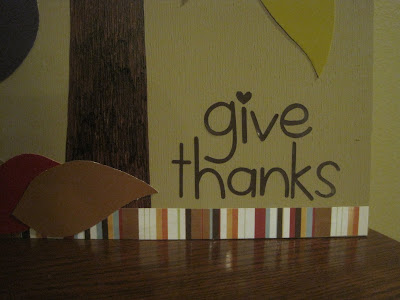


I glued the leaves on with my glue gun.


Sometime this week when my husband and I have time we are going to write what we are thankful for on each leaf. It will be a great reminder throughout the month.

The best part of this Craft is it only cost me $7 dollars total. All I bought was the scrapbook paper for the bottom, the scrapbook letters, and the board.

Saturday, October 16, 2010

Halloween Subway Art

A few weeks ago I saw this Halloween subway art at Jane of All Crafts and fell in love with it. I immediately ran to target to find the rub-ons and couldn't find them anywhere... so I went to another, and another... and another. I seriously went to like 6 targets. (My hubby really loved me that day!) After not finding any I was very sad, and gave up on the idea. :(

Then a few days ago I decided I could just make one on Photoshop... Yesss! After downloading a bazillion fonts and deciding what pics I wanted on there I just went with it. I pretty much copied the original, making a few changes.

Here's how mine turned out:


Right now its hanging out with my black cat on a bookshelf until I decide where I really want it to go.


This project cost me $6. My printer is having some issues lately so I decided to print it off at walmart, since its like 2 seconds away from my house. I picked up a frame while I was there for $3. To print a 8 x 10 is kind of pricey... compared to free from home, but I was so excited so I paid the $2 something for one print. I'm fine with the $6 price. :)

And since I love all of you, I decided to give you the file so you can have it for yourself! All I ask is that you become a follower (if you aren't already!) and pass along my blog to someone else! I also love comments!

Click Here to Download!
Related Posts Plugin for WordPress, Blogger...